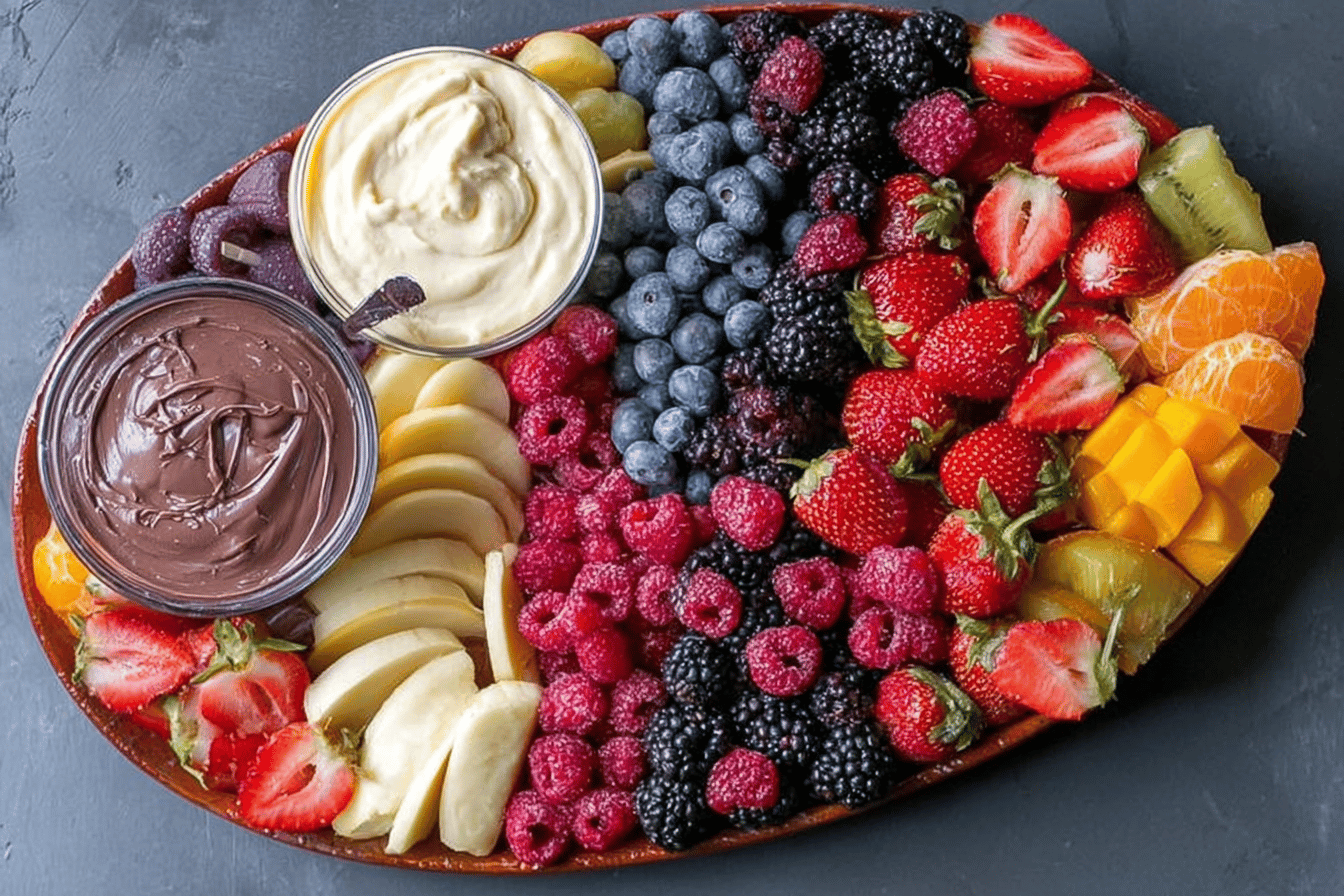
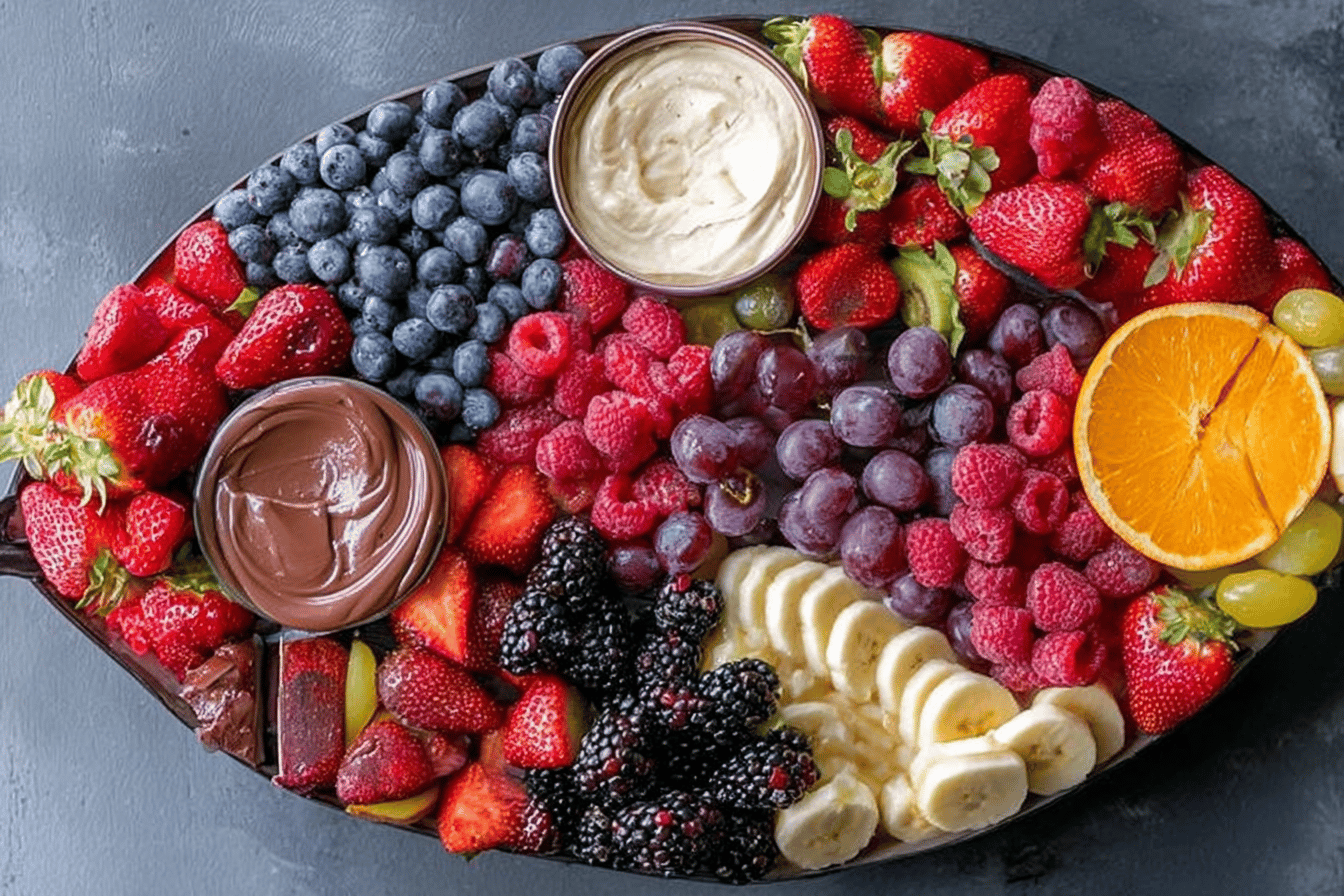
Fruit Charcuterie Board
Introduction
A fruit charcuterie board is a gorgeous and colorful way to serve fruit that’s perfect for any gathering. This delicious and visually stunning dish is the perfect addition to a party, family gathering, or even just a fun way to enjoy fresh fruit. The beauty of a fruit charcuterie board lies in its versatility and the creative freedom it offers. You can customize it with your favorite fruits, add dips, and even include other treats. Here’s how to prepare your own impressive fruit charcuterie board with simple steps and detailed guidance.
Detailed Ingredients with measures
1 cup sliced watermelon
Fresh, juicy watermelon makes a refreshing base for the board.
1 cup halved strawberries
Strawberries add vibrant color and a sweet-tart flavor to the mix.
1 cup grapes
Include a mix of red and green grapes for variety and a pleasing presentation.
1 cup pineapple chunks
Bright and tangy pineapple offers a tropical twist to the board.
1 cup blueberries
These small but mighty berries deliver a pop of color and antioxidants.
1 cup apple slices
Crisp and crunchy apple slices balance the softer textures of the other fruits.
1 cup cantaloupe or honeydew melon
Melons like cantaloupe or honeydew are a great addition for their subtle sweetness.
Optional dips
Vanilla yogurt or chocolate sauce work well for dipping the fruits.
Prep Time
Creating a fruit charcuterie board requires minimal preparation and doesn’t take much time at all. Most of your time will be spent slicing and arranging the fruit, but the process is simple and fun. For an extra time-saving tip, consider purchasing some pre-sliced fruits if you’re in a hurry.
Cook Time, Total Time, Yield
Cook Time
There’s no cooking involved in assembling a fruit charcuterie board, making this recipe perfect for fast and easy preparation.
Total Time
Including all the slicing, dicing, and arranging, you’ll spend no more than 20 minutes creating this colorful masterpiece.
Yield
A fruit charcuterie board typically serves around 4-6 people, depending on portion sizes. If you’re hosting a larger gathering, simply double or triple the fruit amounts as needed.
Try delighting your guests with this healthy and beautiful snack option, perfect for any occasion! Assembling it is a breeze, and the result is always picture-worthy and satisfying.
Detailed Directions and Instructions
Step 1: Prepare the Board
Select a flat, clean surface like a wooden or marble serving board. Ensure it is large enough to fit all the ingredients.
Step 2: Wash and Dry the Fruit
Thoroughly rinse all fruits to remove dirt or pesticides. Pat them completely dry with a clean towel to prevent water from making the board soggy.
Step 3: Cut the Fruit
Slice fruits like apples, oranges, kiwi, and bananas into bite-sized pieces or wedges. For fruits like strawberries or grapes, you can keep them whole or halve them for easier handling. Remove any seeds or pits, if necessary.
Step 4: Arrange Larger Fruits
Begin placing the larger fruit pieces, such as sliced apples, melons, or oranges, on the board first. This creates a foundation for building the display.
Step 5: Add Medium-Sized Fruits
Next, add the medium-sized fruits such as kiwi slices, strawberries, or smaller fruits that add variety in size and color. Fit them naturally around the larger fruits.
Step 6: Add Smaller Fruits and Clusters
Place the smaller fruits like blueberries, raspberries, and grapes into the remaining spaces. Group small fruits for better visual appeal and to make it easy for guests to grab them.
Step 7: Include Dips or Spreads
Add small bowls of dips like chocolate, honey, or whipped cream to the board. Position them in the center or balanced on opposite ends of the board for balance.
Step 8: Finalize with Garnishing
For added flair, garnish the board with fresh mint leaves or edible flowers. This adds a touch of elegance and a pop of color.
Notes
Note 1: Choose Seasonal Fruits
Use fruits that are in season as they tend to be fresher, more flavorful, and affordable.
Note 2: Keep Balance in Colors and Shapes
Arrange the fruits so there is a good mix of colors, textures, and shapes across the board for visual appeal.
Note 3: Prevent Browning
Toss fruits like apple slices or banana slices in lemon juice to prevent them from browning.
Note 4: Consider Dietary Restrictions
Label dips or spreads to accommodate any dietary restrictions or allergies among guests.
Note 5: Serve Fresh
Prepare the board close to the serving time to ensure the fruits remain fresh and vibrant. If needed, keep the board refrigerated until it’s ready to serve.
Cook Techniques
Create a Visual Flow
Position the larger fruits or bowls on the board as anchor points. This will help create a visual flow and make the board appear balanced.
Cut Fruit to Showcase Colors and Textures
Slice fruits like kiwis, oranges, and strawberries to display their vibrant colors and inner textures. This adds an extra layer of visual appeal to your board.
Group Similar Items Together
Arrange similar fruits near each other to create a cohesive and organized appearance. Keep like textures and colors close for a harmonious design.
Fill Gaps with Smaller Items
Use smaller fruits such as blueberries, raspberries, or nuts to fill in empty spaces, which creates a fuller and more inviting presentation.
Add Decorative Touches
Incorporate garnishes like fresh mint leaves or edible flowers for additional detail. These decorations enhance the look without overpowering the main elements of the board.
FAQ
What Fruits Are Best for a Charcuterie Board?
Choose a mix of fruits that balance sweet and tangy flavors. Common choices include grapes, berries, kiwis, oranges, and melons.
How Do You Keep Fruit Fresh on the Board?
To keep fruit fresh, cut it right before assembling the board and refrigerate until ready to serve. Avoid fruits that brown quickly, like apples, unless treated with lemon water.
How Many Fruits Should I Include?
Aim to include at least 5-7 different types of fruit to create variety. Adjust the quantity based on the number of people you are serving.
Can I Add Other Items to the Board?
Yes, you can complement the fruits with items like cheeses, nuts, and dips. These additions enhance the flavor profile and create a well-rounded offering.
What Size Should the Board Be?
The size of the board depends on the number of servings. Use a medium to large board for parties and a smaller board for intimate gatherings.
Can I Make the Board Ahead of Time?
While it’s best to assemble it fresh, you can prepare the fruits in advance by washing, drying, and slicing them. Store them in airtight containers until ready to use.
Conclusion
A fruit charcuterie board is a perfect blend of simplicity and sophistication, making any gathering more vibrant, flavorful, and memorable. The combinations of fresh fruits paired with dips and complementary items create a balance of sweetness and zest that will delight any palate. Whether you are hosting a casual brunch or an elegant dinner party, this board is a crowd-pleaser that is easy to assemble and impossible to resist.
More Recipes Suggestions and Combination
Cheese and Fruit Pairing Ideas
Combine cheeses like brie, goat cheese, or sharp cheddar with sweet fruits such as grapes, figs, or apples for a perfect medley of flavors.
Chocolate and Nut Dessert Board
Incorporate a variety of chocolates, including dark and milk, alongside fresh berries, dried fruits, and an assortment of nuts for a decadent dessert option.
Summer Citrus and Tropical Board
Create a tropical vibe by adding fruits like pineapple, mango, papaya, and citrus slices, paired with coconut shavings or honey drizzle for an exotic burst of flavor.
Sweet and Salty Board
Blend fruits like strawberries and melon with savory items such as cured meats, crackers, or pretzels to satisfy multiple cravings in one bite.
Breakfast-Themed Fruit Board
Try mixing fresh fruits like berries, bananas, and watermelon with yogurt, granola, and mini pastries for a breakfast-inspired platter.
Seasonal Themed Boards
Customize your board based on the season by incorporating fruits like pomegranate and persimmons in the winter or peaches and cherries during the summer months.