Japanese Katsu Bowls with Tonkatsu Sauce Recipe
Craving crispy, golden-brown comfort food with a savory-sweet punch? Let’s explore a dish that blends tradition with modern flair. Japanese katsu bowls combine tender, breaded cutlets with fluffy rice and tangy tonkatsu sauce – a meal as versatile as it is delicious.
This recipe carries generations of family memories. Many Japanese households pass down their secret sauce variations, often tweaked with ingredients like apples or Worcestershire. Whether you choose chicken, pork, or fish, the magic lies in achieving that perfect crunch.
You’ll discover how to make restaurant-quality katsu at home. We focus on simple techniques – from pounding the meat evenly to frying at the right temperature. The homemade tonkatsu sauce takes just minutes but elevates the entire dish.
Key Takeaways
- Learn a traditional yet adaptable recipe rooted in Japanese culinary heritage
- Discover how to customize the dish with chicken, pork, or plant-based alternatives
- Master the art of making rich, balanced tonkatsu sauce from scratch
- Understand the cultural significance behind this comfort food staple
- Get pro tips for achieving crispy, golden breading every time
Introduction and Background
Every bite tells a story in this iconic dish. What began as a humble family tradition evolved into a culinary symbol of celebration across Japan. Let’s explore how simple ingredients became cultural treasures.
The Story Behind the Dish
In Osaka homes, parents often prepared this meal to mark academic milestones. A grandmother’s handwritten recipe reveals why: “The crisp sound of panko crust reminds us that hard work yields golden brown rewards.” Families perfected their versions using fresh shredded cabbage from local markets and rice seasoned with pride.
Cultural Significance in Japanese Cuisine
This dish embodies seasonal balance – crispy textures contrast with tender meat, while tangy sauce cuts through richness. Chefs insist the salt pepper blend matters as much as frying technique. Street vendors popularized pairing cabbage salads with fried cutlets, creating a meal that’s both hearty and refreshing.
Restaurants later elevated it using artisanal breadcrumbs and sauce recipes passed through generations. Today, it remains a staple where comfort meets craftsmanship – proof that great flavors transcend time.
Essential Ingredients and Equipment
Great katsu starts with the right components. Precision in your pantry and kitchen setup transforms simple elements into a crave-worthy meal. Let’s break down what you’ll need to create that iconic crunch.
![How to Make Perfect Katsudon [Japanese Pork Cutlet Bowl]](https://recipesquickie.com/wp-content/cache/flying-press/7c6c4c5a60df40908f51a4190f8ca7d2.jpg)
Quality Ingredients for Crispy Katsu
Gather these essentials:
- 2 boneless chicken breasts (6-8 oz each)
- 1 cup all-purpose flour for initial coating
- 2 large eggs beaten with 2 tbsp water
- 2 cups panko breadcrumbs – the flaky texture matters
- Neutral oil like canola or vegetable (3 cups for frying)
Fresh eggs help the panko stick better, while chilled chicken ensures even cooking. Measure flour and breadcrumbs using dry measuring cups – level them with a knife for accuracy.
Must-Have Kitchen Tools
Your success toolkit includes:
- Heavy skillet or Dutch oven (12-inch ideal)
- Meat mallet or rolling pin to pound chicken
- Wire rack for draining excess oil
- Three shallow bowls for dredging stations
A candy thermometer helps maintain oil at 350°F. Without one, test by dropping a panko flake – it should sizzle immediately without burning.
Additional Ingredient Options and Substitutions
Customize based on dietary needs:
- Use gluten-free flour and panko alternatives
- Swap chicken for pork cutlets or firm tofu
- Try avocado oil for higher smoke points
For egg allergies, mix 1 tbsp ground flaxseed with 3 tbsp water per egg. The key? Maintain the flour-egg-panko sequence for that signature golden armor.
Preparing Your Chicken Katsu
Transform ordinary chicken into a crispy masterpiece with these essential techniques. Proper preparation ensures every bite delivers that satisfying crunch while keeping the meat juicy. Let’s break down the process into three fail-proof stages.
Pounding and Seasoning the Chicken
Place chicken breasts between plastic wrap. Pound them to ½-inch thickness using a mallet or rolling pin. This creates even cooking and tenderizes the meat. Season both sides generously with salt and pepper – about ¼ tsp each per breast.
Coating with Flour, Egg, and Panko
Set up three shallow bowls: flour, beaten egg mixed with water, and panko. Dredge each breast in flour first, shaking off excess. Dip fully into the egg wash, then press firmly into panko. Rotate to coat all sides, using dry hands to avoid clumps.
Heat oil to 350°F in a heavy skillet. Carefully lower the chicken into the pan. Fry for 3-4 minutes per side until golden-brown. Monitor the temperature – too low causes sogginess, too high burns the coating.
Transfer cooked cutlets to a wire rack. Rest for 2 minutes before slicing. This preserves the crispy exterior while locking in juices. For extra crunch, double-coat by repeating the egg and panko steps after the first layer sets.
Crafting the Perfect Tonkatsu Sauce
The secret to unforgettable katsu lies in its signature sauce—a glossy blend that transforms each bite. Unlike store-bought versions, homemade recipes let you balance sweet, savory, and tangy notes with precision. Let’s build this flavor bridge between crispy cutlets and fluffy rice.

Homemade Sauce Recipe and Measurements
Combine these in a saucepan:
- ½ cup ketchup (for sweetness)
- 3 tbsp Worcestershire sauce (adds depth)
- 2 tbsp soy sauce (umami base)
- 1 tbsp sugar (balances acidity)
Whisk over medium heat until simmering. Cook 3 minutes to thicken slightly. Cool before transferring to a sauce cup for serving. This makes enough for four bowls—double the batch if you love extra drizzle.
Tips for Achieving the Ideal Sweet and Tangy Flavor
Adjust ratios to taste: Add honey for more sweetness or lemon juice for brightness. Always heat the mixture gently—medium heat prevents burning while melding flavors. Test a spoonful on cooled rice to check balance.
Pour sparingly at first—a zigzag drizzle over the cutlet adds visual appeal. Keep a small bowl on the side for dipping. Store leftovers in an airtight container for up to two weeks. Reheat gently, stirring to restore smooth texture.
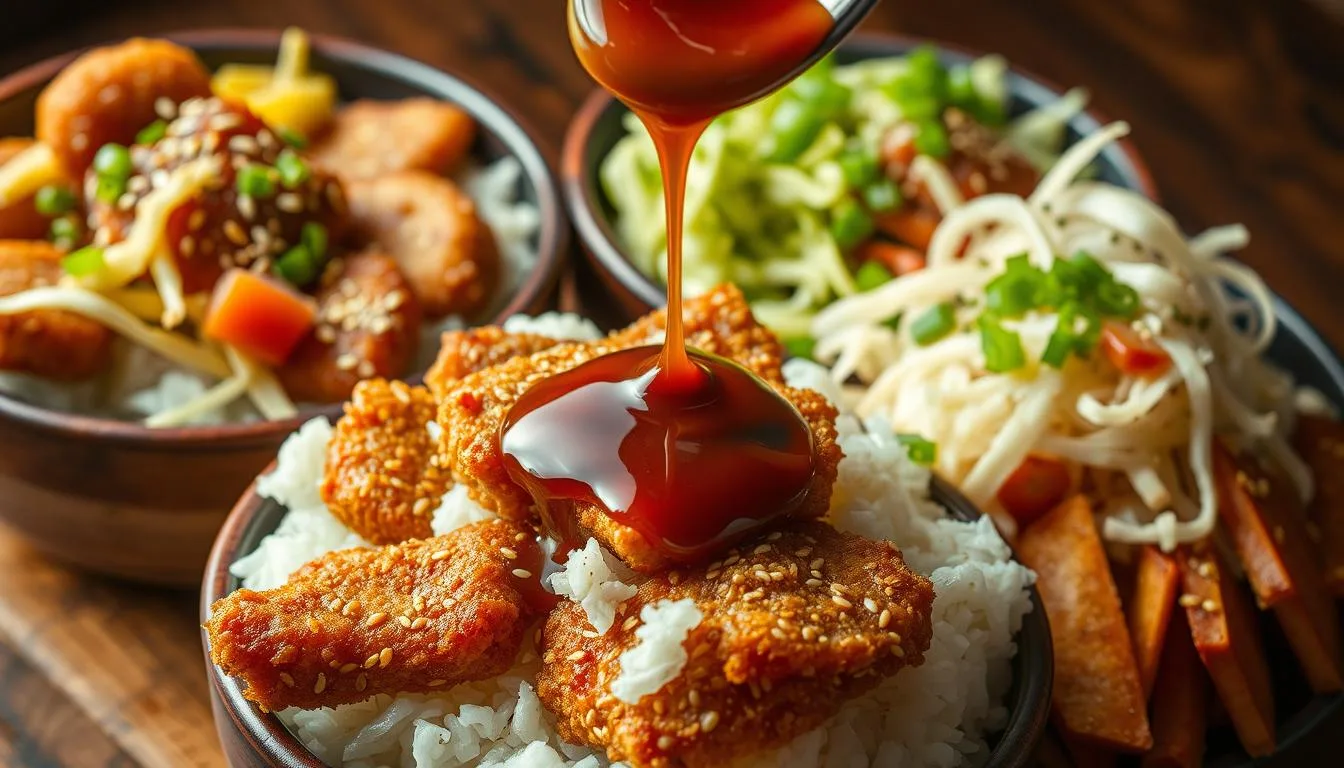
Mastering japanese-katsu-bowls-with-tonkatsu-sauce Assembly and Serving
Assembling the perfect bowl is an art that balances flavor and aesthetics. Follow these steps to create katsu bowls that look as impressive as they taste, using smart techniques to preserve crunch and visual appeal.
Plating, Garnishing, and Final Touches
Start with 2 cups cooked short-grain rice per bowl. Press it gently into rice bowls using a measuring cup for consistent portions. Layer thinly sliced cabbage over the rice – its crunch contrasts beautifully with warm grains.
Place fried cutlets on top immediately after slicing. This keeps their crispy texture intact. Drizzle tonkatsu sauce in zigzags, then scatter green onions diagonally across the bowl. Add pickled ginger or sesame seeds for color contrast.
Leftover katsu? Reheat slices in an air fryer at 375°F for 3 minutes. This method revives the crust better than microwaving. Serve extra sauce in small cups on the side for dipping.
Balance portions carefully: 1 cup rice, ½ cup cabbage, and 5-6 oz protein per bowl. The golden rule? Let each ingredient shine without overcrowding. Your final creation should invite the eye to explore every layer before the first bite.
Conclusion
Now that you’ve got the tools, it’s time to make this recipe your own. Whether using chicken breasts, pork, or plant-based cutlets, the technique remains key. Remember to heat oil to 350°F for that golden crunch and drain excess oil on a wire rack – your texture depends on it.
Try swapping proteins or testing vegetable oil alternatives like avocado. Leftovers? Reheat slices in an air fryer to revive crispiness. Store cooled cutlets separately from rice for up to three days.
Share your creations online – tag photos to inspire others. That first bite of tender meat beneath a crispy crust? That’s your reward for mastering balance. Ready to make memories around your kitchen table?
FAQ
Can I use an air fryer to cook chicken katsu instead of frying?
Yes! Preheat the air fryer to 375°F (190°C), lightly spray the coated chicken with oil, and cook for 10–12 minutes, flipping halfway. This method reduces oil while keeping the crispy texture.
What’s a substitute for panko breadcrumbs if I can’t find them?
Regular breadcrumbs work, but they’ll be less crunchy. For a closer texture, crush unsweetened cornflakes or use gluten-free panko. Avoid dense alternatives to maintain the dish’s signature crispiness.
How long does homemade tonkatsu sauce last in the fridge?
Store it in an airtight container for up to 2 weeks. Ingredients like soy sauce, Worcestershire, and ketchup act as natural preservers, but discard if you notice mold or off smells.
Can I prepare the chicken cutlets ahead of time?
Coat and refrigerate them uncooked for up to 24 hours. For best results, fry just before serving to avoid soggy breading. Leftover cooked katsu loses crispiness but can be reheated in an oven or air fryer.
What’s the ideal oil temperature for frying katsu?
Heat vegetable oil to 350°F (175°C). Use a thermometer or test with a panko crumb—it should sizzle gently without burning. Too hot, and the coating burns; too cool, and the chicken absorbs excess oil.
Can I use pork instead of chicken for this recipe?
Absolutely! Pork tonkatsu is traditional. Use thin pork chops, pound them evenly, and follow the same coating steps. Adjust frying time slightly based on thickness.
How do I prevent the panko coating from falling off?
Pat the chicken dry before coating. Press flour firmly onto the meat, dip fully in beaten egg, and press panko into the surface. Let the breaded cutlets rest 5 minutes before frying to set the layers.
What sides pair well with katsu bowls besides shredded cabbage?
Try pickled vegetables, miso soup, or steamed edamame. For rice bowls, add a soft-boiled egg or drizzle with spicy mayo. Season with salt, pepper, or furikake for extra flavor.