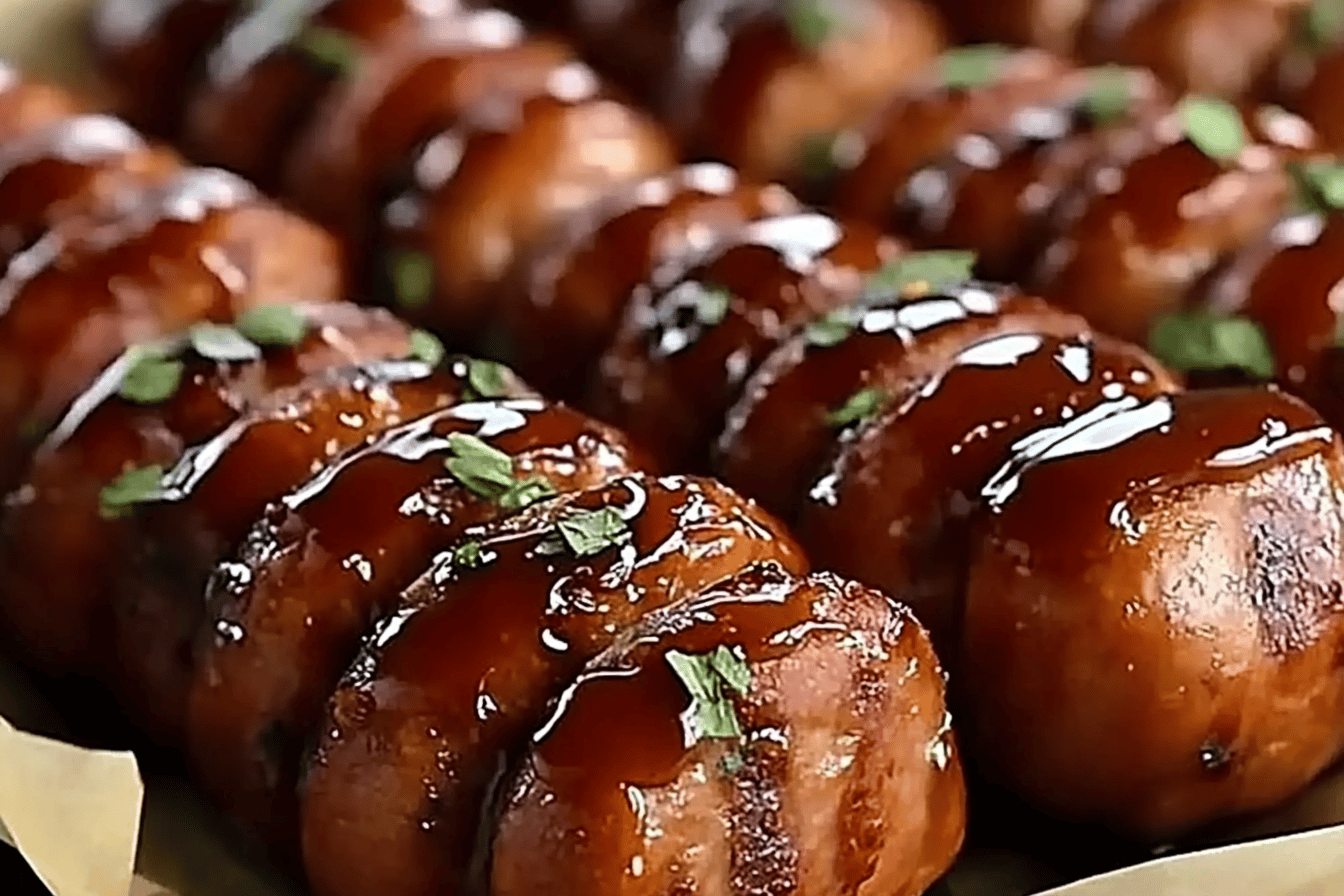
Maple BBQ Hasselback Kielbasa Bites
Introduction
Are you searching for a quick, delicious, and crowd-pleasing appetizer for your next gathering? These Maple BBQ Hasselback Kielbasa Bites will steal the show with their sweet, smoky, and savory flavor. This recipe combines the richness of kielbasa with a delectable maple and barbecue glaze, offering a perfect balance of taste in every bite. Ideal for holidays, potlucks, or family get-togethers, this dish is both simple to prepare and incredibly satisfying.
Detailed Ingredients with Measures
Kielbasa
One package (14 ounces) of kielbasa sausage
Maple Syrup
Two tablespoons of pure maple syrup
Barbecue Sauce
Two tablespoons of your favorite barbecue sauce
Optional Garnishes
Fresh parsley or sliced green onions for garnish
Prep Time
Preparing these delicious bites is quick and easy, taking only 10 minutes. You’ll create slits in the kielbasa, ensuring the sauce seeps deep into every cut for maximum flavor.
Cook Time, Total Time, Yield
Cook these Hasselback Kielbasa Bites in just 20 minutes, bringing the total time for this recipe to only 30 minutes from start to finish. This recipe yields approximately 4 servings, making it perfect as an appetizer or snack for smaller groups. Adjust portions accordingly for larger gatherings, doubling or tripling the recipe as needed.
By combining only a handful of simple ingredients, these flavorful bites are guaranteed to impress your guests while requiring minimal effort.
Detailed Directions and Instructions
Step 1: Preheat Oven
Preheat your oven to 400°F (200°C) to ensure it’s warm and ready for baking.
Step 2: Prepare Kielbasa
Cut the kielbasa into bite-sized pieces, about 2 inches long. Take each piece and carefully make thin, evenly spaced slices across the top (Hasselback style), ensuring not to cut all the way through to the bottom.
Step 3: Make the Maple BBQ Glaze
In a small bowl, mix together maple syrup and BBQ sauce until well combined. Adjust the amounts to taste based on sweetness or tanginess preferences.
Step 4: Place Kielbasa on Baking Sheet
Arrange the sliced kielbasa pieces on a lined or greased baking sheet with the cut (Hasselback) side facing up. This will allow the glaze to seep into the slices.
Step 5: Brush Glaze onto Kielbasa
Using a silicone brush or spoon, generously coat each piece of kielbasa with the maple BBQ glaze, ensuring it gets into the slits and is evenly distributed over the surface.
Step 6: Bake in Oven
Place the baking sheet in the preheated oven and bake for 15–20 minutes, or until the kielbasa is caramelized and slightly crispy on the edges.
Step 7: Optional Broiling
For added caramelization, turn the oven to broil for 2–3 minutes at the end of baking. Keep a close eye to prevent burning.
Step 8: Remove and Serve
Take the kielbasa bites out of the oven and allow them to cool slightly. Transfer them to a serving platter and serve warm. These taste great as an appetizer or snack.
Notes
Note 1: Adjusting Sweetness
Feel free to adjust the ratio of maple syrup and BBQ sauce to your taste. More syrup will make it sweeter, while more BBQ sauce adds tanginess.
Note 2: Use a Sharp Knife
To achieve clean Hasselback cuts, make sure your knife is sharp, and avoid splitting the slices too deep, as this will keep the kielbasa intact.
Note 3: Baking Sheet Preparation
Line your baking sheet with aluminum foil or parchment paper for easy cleanup. Spray with cooking spray to prevent sticking.
Note 4: Storage and Reheating
Leftovers can be stored in an airtight container in the refrigerator for up to 3 days. Reheat in the oven or a skillet to maintain the caramelized texture.
Note 5: Glaze Alternatives
You can experiment with different glazes, such as honey mustard, teriyaki, or sweet chili sauce, for variations of flavor.
Cook techniques
Hasselback Slicing Technique
Use a sharp knife to make evenly spaced slices across the kielbasa, stopping just before reaching the bottom. This ensures the kielbasa holds together while allowing the sauce to seep into the cuts for maximum flavor. A helpful tip is to place chopsticks or skewers on each side of the kielbasa to prevent cutting through completely.
Brush and Baste with Sauce
Generously brush the maple BBQ sauce over the kielbasa, ensuring the sauce gets into each slice for a rich and bold taste. Reapplying sauce during cooking will enhance the flavor while keeping the dish moist and caramelized.
Baking for Even Cooking
Place the prepared kielbasa on a lined or greased baking sheet to prevent sticking. Bake in the oven until the kielbasa is heated through and the sauce becomes sticky and caramelized, ensuring the dish is deliciously tender and flavorful.
Broiling for Added Texture
After baking, use the broil function to crisp up the edges of the kielbasa and caramelize the sauce further. Monitor closely to avoid burning and adjust the broil time according to your preferred texture.
FAQ
What type of kielbasa is best for this recipe?
Use a fully cooked kielbasa for this recipe to ensure proper texture and flavor. You can select your favorite brand or type, including beef, pork, or turkey kielbasa.
Can I use a different BBQ sauce?
Yes, you can substitute your favorite BBQ sauce if desired. However, pairing it with maple syrup creates a delightful balance of sweetness that complements the smokiness of the kielbasa.
How do I prevent cutting the kielbasa all the way through?
You can place chopsticks, wooden spoons, or skewers on either side of the kielbasa to act as a barrier, preventing the knife from cutting all the way through.
What sides pair well with these bites?
These hasselback kielbasa bites pair perfectly with rice, roasted vegetables, or a fresh salad. They are also great as an appetizer served with toothpicks for easy handling.
Can I make this recipe in advance?
Yes, you can prepare the kielbasa by slicing and brushing with sauce ahead of time. Store it covered in the fridge until you’re ready to bake. Bake just before serving for best results.
How do I store leftovers?
Store any leftover kielbasa bites in an airtight container in the refrigerator for up to 3 days. Reheat in the oven or a skillet to maintain the caramelized texture.
Is this recipe suitable for grilling?
Yes, you can grill the prepared kielbasa instead of baking. Use indirect heat to cook the kielbasa to avoid burning the sauce, and brush on additional sauce as it grills.

Conclusion
Maple BBQ Hasselback Kielbasa Bites are a delightful and easy-to-make dish that perfectly balances sweet and smoky flavors with a fun twist of texture. This recipe is a crowd-pleaser and is ideal for gatherings, parties, or even as a quick appetizer. The combination of the maple syrup and BBQ glaze creates a rich and indulgent flavor that pairs perfectly with the savory kielbasa. It’s a simple way to elevate an everyday ingredient into something truly special.
More recipes suggestions and combination
Honey Mustard Glazed Chicken Bites
Try preparing chicken bites glazed with a blend of honey and mustard for a sweet and tangy complement to the kielbasa bites.
Sweet Chili Meatballs
Serve sweet chili-glazed meatballs alongside these bites for an added layer of juicy, spicy-sweet flavors.
Maple Roasted Vegetables
Roast vegetables like carrots, sweet potatoes, and Brussels sprouts with a maple glaze for a cohesive and healthy pairing.
Cheesy Garlic Breadsticks
Pair the BBQ bites with garlic and cheese breadsticks for a comforting carb addition.
Spicy Pineapple Salsa
Add a refreshing and spicy pineapple salsa to the mix for a tropical, zesty touch.
Smoked Sausage Potato Skewers
Complement the flavors of the kielbasa bites by preparing skewers with sausage, potatoes, and spices grilled to perfection.
Balsamic Glazed Brussels Sprouts
For a savory and tangy vegetable side, consider balsamic-glazed roasted Brussels sprouts as an accompaniment.