Creamy Oreo Pudding Pie Recipe for Dessert Lovers
If you crave a decadent treat that requires zero oven time, this no-bake dessert is your answer. Combining the crunch of Oreo cookies with a velvety pudding filling, this recipe delivers a mousse-like texture that melts in your mouth. It’s ideal for busy weeknights, potlucks, or even holiday gatherings.
You’ll love how simple it is to prepare. With just six ingredients—like heavy cream, instant pudding mix, and Oreos—this dessert comes together in under 30 minutes. The layers of crushed cookie crust and airy filling create a rich flavor balance that satisfies sweet cravings without overwhelming your palate.
Families adore this recipe for its crowd-pleasing appeal. Many reviewers mention it’s become their go-to for birthdays or summer barbecues. Plus, it’s easy to customize: try adding chocolate shavings or a drizzle of caramel for extra flair.
Key Takeaways
- No-bake recipe saves time and effort
- Uses everyday ingredients for quick prep
- Combines crunchy Oreo crust with fluffy filling
- Perfect for holidays, parties, or casual treats
- Highly customizable with toppings or mix-ins
- Consistently praised in user reviews
Ingredients and Essential Tools
To create a dessert that’s both crunchy and creamy, start with quality ingredients and reliable kitchen tools. This no-bake recipe keeps things simple—you likely have most items in your pantry already.
Crust Ingredients
You’ll need just three items for the base:
- 24 Oreos (including filling)
- 5 tbsp melted butter
- 1/4 tsp salt (optional)
Crush the cookies into fine crumbs using a food processor. For a firmer crust, use full-fat butter and press the mixture firmly into your pie plate.
Filling Essentials
The velvety center requires:
- 2 (3.4 oz) packs instant pudding mix
- 2 1/2 cups cold milk
- 1 cup thawed Cool Whip
Use a bowl and electric mixer to blend these until thick. Measure milk precisely with a liquid cup for perfect consistency.
Topping Requirements
Finish with:
- 1 1/2 cups Cool Whip
- Crushed Oreos for garnish
A pastry bag helps create decorative swirls. Chill leftover cookies in an airtight container to maintain crunch.
Pro tip: Double-check your food processor’s capacity before crushing Oreos. For best results, use room-temperature butter that mixes evenly with cookie crumbs.
Choosing the Right Oreos for Your Pudding Pie
The foundation of your dessert’s success starts with selecting the perfect Oreos. Classic varieties work best—their signature crème filling adds richness to both the crust and overall flavor. This balance prevents the pudding layer from becoming overly sweet.
Original Oreos create ideal texture contrasts. Their crisp cookie base holds up against the creamy instant pudding without getting soggy. Avoid flavored versions like mint or birthday cake—they can overpower the delicate pudding mixture.
Gluten-Free Alternatives
Gluten-free Oreos offer identical crunch and taste. Brands like Oreo Gluten-Free use certified ingredients while keeping the iconic design. Testers note these alternatives blend seamlessly into crusts and garnishes.
Quality matters most. Stale cookies crumble unevenly, while fresh ones bind better with butter. For smooth instant pudding integration, crush Oreos to sand-like consistency. This ensures every bite delivers balanced flavors and textures.
Pairing the right Oreo with vanilla pudding creates magic. The cookies’ cocoa notes enhance the filling’s sweetness without competing. Remember: your cookie choice directly impacts both visual appeal and mouthfeel.
Preparing Your Pie Crust
Creating the perfect base for your dessert begins with a well-crafted crust. While store-bought options save time, a homemade Oreo crust delivers unmatched flavor and texture. Let’s explore how to achieve bakery-quality results with minimal effort.
Homemade Vs. Store-Bought Options
For a crust that complements the creamy filling, crush 24 Oreos in a food processor until sandy. Mix with 5 tbsp melted butter—cooled slightly to avoid clumping. Press the mixture into your pan using a measuring cup for even thickness.
Store-bought crusts work in a pinch but lack the bold cocoa flavor of fresh Oreo crust. Homemade versions let you control the salt level and ensure a sturdy base. Refrigerate for 20 minutes before adding filling to prevent crumbling.
Avoid these common mistakes:
- Using hot butter (it melts the cookie filling)
- Under-processing Oreos (chunky crumbs won’t bind well)
- Skipping the chill time (causes a soggy base)
For maximum stability, press the crust firmly against the pan’s sides. This technique creates a professional-looking edge that holds its shape when sliced.
Mastering the oreo-pudding-pie Filling
The secret to a showstopping dessert lies in its filling. This airy layer balances the crunchy crust with velvety richness, creating a texture that’s both light and indulgent. Let’s break down how to achieve perfection.
Mixing Instant Pudding and Heavy Cream
Start by combining two packs of instant pudding mix with 2½ cups cold milk in a large bowl. Use a stand mixer on medium speed for 2 minutes. The mixture should thicken dramatically—when you lift the beaters, it should hold stiff peaks.
Gradually pour in 1 cup heavy cream while mixing. This adds richness and stabilizes the filling. Scrape the bowl’s sides to ensure even blending. Proper measurement here is crucial—too much liquid creates runny results.
Incorporating Cool Whip for Ultimate Creaminess
Once your pudding base is thick, gently fold in 1 cup thawed Cool Whip with a rubber spatula. Use sweeping motions from bottom to top to maintain airiness. Overmixing deflates the fluffiness, so stop when no white streaks remain.
This step transforms the mixture from dense to cloud-like. The Cool Whip lightens the texture without overpowering the pudding flavor. Chill the filling for 10 minutes before layering—it firms slightly for cleaner slices.
Assembling Your Pie: Layering Techniques
The art of layering transforms simple components into a dessert masterpiece. This Oreo pudding pie gets its signature look through careful stacking of textures. Start with a fully chilled crust to prevent shifting during assembly.
Evenly Spreading the Filling
Pour your filling into the crust using a spatula. Begin at the center and gently push the mixture outward in circular motions. This technique prevents air pockets and creates uniform thickness.
Chill the base layer for 10 minutes before adding topping. This brief rest helps the filling set slightly, making it easier to achieve clean edges when slicing later.
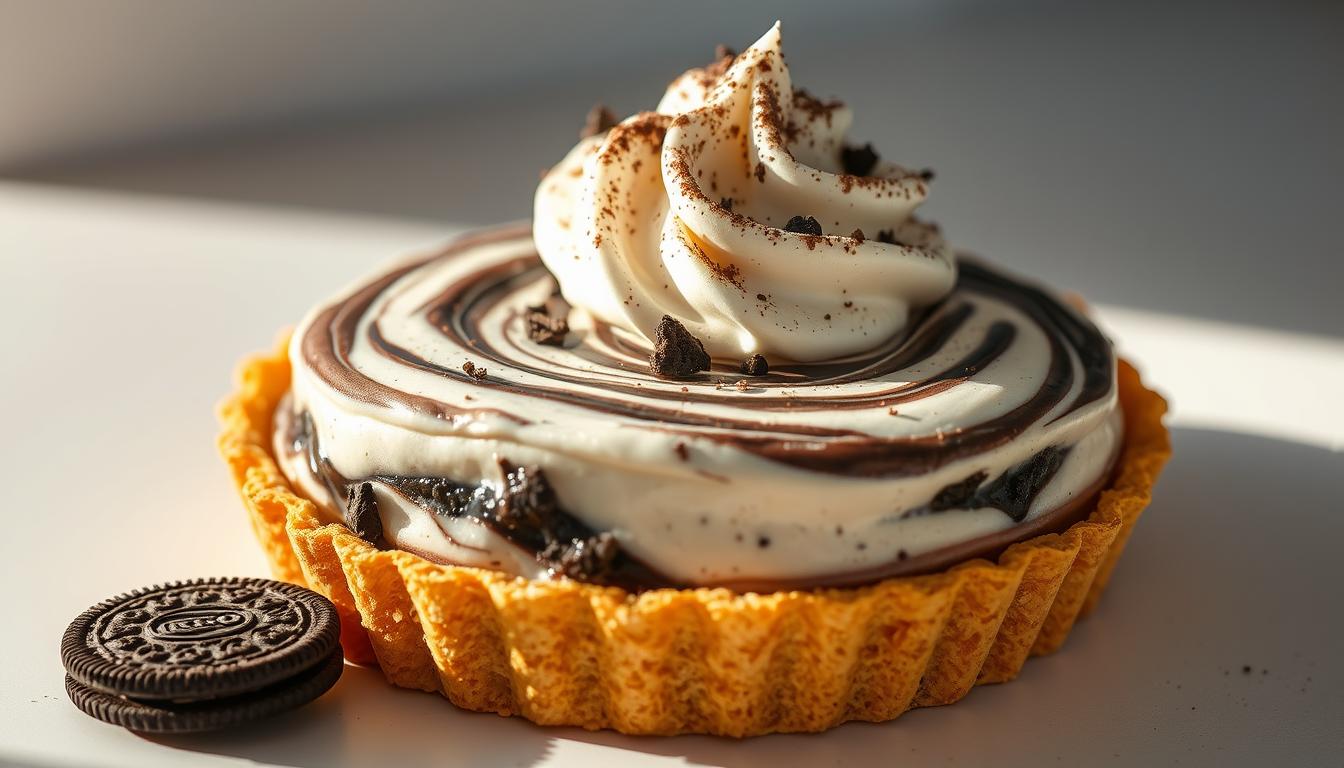
Perfecting the Whipped Topping with Crushed Oreos
Fold ½ cup crushed Oreos into your whipped cream for added crunch. Use a piping bag with a star tip to create decorative swirls. Leave a ½-inch border around the edge to showcase the layers.
Finish with a sprinkle of crushed Oreos across the topping. Press some pieces lightly into the cream so they adhere when served. For professional results, wipe the plate’s rim with a damp cloth after assembly.
No-Bake Dessert Magic: Quick Prep and Chill Time
Dessert magic happens when you let your fridge do the work. This recipe shines with set-and-forget simplicity, requiring just 15–20 minutes of hands-on effort. You’ll spend more time deciding on toppings than actually preparing the treat!

Time-Saving Tips for Busy Dessert Lovers
Start by using a pre-made crust to slash prep time. A stand mixer whips the filling in under 3 minutes—no arm fatigue. Layer everything quickly, then let refrigeration handle the rest.
Though the dessert needs 4–8 hours to firm up, your active role ends after assembly. Plan ahead: make it the night before events or during morning coffee breaks. The long chill enhances flavors while freeing your schedule.
For even faster results:
- Chill your mixing bowl beforehand to speed whipping
- Crush cookies in a zip-top bag with a rolling pin
- Use store-bought whipped topping if short on time
Busy parents and professionals love this approach. As one reviewer notes, “It’s like hitting pause on chaos—you get credit for homemade without the hassle.” Minimal effort, maximum reward.
Expert Tips for Dessert Presentation
Transform your creation into a showstopper with smart styling choices. A beautifully presented dessert elevates the experience, turning casual bites into memorable moments. These professional techniques highlight textures and flavors while making your dish Instagram-ready.
Serving Suggestions and Garnishing Ideas
Start with a chilled bowl or clear glass to showcase layers. Dust the top with powdered sugar using a fine sieve—it adds elegance without overwhelming sweetness. For crunch, press chocolate curls into the whipped topping before serving.
Pipe extra whipped topping around the edges using a star tip. Add mini chocolate chips between swirls for contrast. Balance colors by pairing dark cocoa garnishes with bright mint leaves or raspberries.
Creative Recipe Adjustments for Extra Flavor
Swap regular milk for almond or oat varieties in the vanilla pudding mixture. This adds subtle nutty notes while keeping the food light. Reduce sugar by 1 tbsp if using sweetened plant-based milk.
Boost richness by folding 2 oz melted dark chocolate into the vanilla pudding filling. For lower-fat options, use light Cool Whip and skim milk. Always taste-test ingredients before assembling to ensure flavor harmony.
Layer crushed cookies between the topping and filling for visual drama. Serve individual portions in martini glasses to emphasize the dessert’s height. Remember: your bowl choice directs the eye to your hard work!
Exploring Variations: Chocolate and Peanut Butter Options
Take your dessert game to new heights by experimenting with bold flavor twists. While the classic version shines, swapping key ingredients unlocks exciting profiles that cater to diverse cravings. Let’s dive into crowd-pleasing adaptations.
Alternative Flavors Explained
For intense richness, replace vanilla pudding mix with chocolate varieties. Use two packs of store-bought chocolate pudding to maintain thickness. Layer it between crushed cookies and whipped topping for a triple-textured delight.
Peanut butter lovers can blend ½ cup creamy spread into the filling. Reduce fat content by using powdered peanut butter mixed with water. This adds nutty depth without overwhelming the Oreo base.
Balance intense flavors with lighter whipped topping. Coconut or almond-based versions work beautifully. Dust cocoa powder over each slice to highlight chocolate layers visually. Remember: bolder mixes need longer chilling—aim for 6+ hours.
Test small batches before events. One tester raves: “Swirling peanut butter into the chocolate pudding layer created a Reese’s-inspired masterpiece!” Your creativity determines the outcome.
Conclusion
Bringing together simplicity and indulgence, this dessert proves you don’t need hours to impress. Crushed Oreos transform into a buttery crust, while vanilla pudding blended with whipped cream creates cloud-like layers. Every bite balances crunch and silkiness—a testament to smart ingredient pairings.
Best part? It’s easy make with pantry staples. No oven means more time for creativity. Customize with caramel drizzle or fresh berries. Just chill, slice, and watch smiles appear.
Store leftovers in an airtight container for up to three days. The dessert stays fresh, though it rarely lasts that long. Share your twist online—readers love swapping topping ideas!
From first-time bakers to seasoned hosts, this treat earns its spot as a top crowd-pleaser. Whip it up tonight. Your pie journey starts with one cup of crushed cookies and a dreamy pudding mix. Ready, set, indulge!
FAQ
Can I use gluten-free Oreos for the crust?
Yes! Gluten-free Oreo alternatives work well. Crush them with melted butter, just like regular cookies, for a celiac-friendly base.
How do I prevent the filling from becoming lumpy?
Whisk the instant pudding mix and milk vigorously for 2 minutes. For extra smoothness, chill the mixture before folding in Cool Whip.
Can I substitute homemade whipped cream for Cool Whip?
Absolutely. Use 2 cups of stabilized whipped cream to maintain texture. Avoid overmixing to keep the filling light and airy.
How long should the pie chill before serving?
Let it set in the fridge for at least 4 hours. For a firmer texture, freeze it for 30 minutes before adding the topping.
What’s the best way to crush Oreos without a food processor?
Place cookies in a sealed bag and roll with a rolling pin. Aim for fine crumbs for the crust and chunky pieces for garnish.
Can I use sugar-free pudding mix?
Yes, sugar-free chocolate pudding works without altering measurements. Adjust sweetness by adding a teaspoon of vanilla extract if needed.
How do I add peanut butter to the recipe?
Swirl ¼ cup of melted peanut butter into the filling layer or mix it with crushed cookies for a nutty twist.
Why is my crust soggy?
Press the crumb mixture firmly into the pan and pre-chill it for 15 minutes. This creates a barrier against the creamy filling.